Wednesday, July 20, 2011

How to create an email in gmail

How to create an email in gmail - If you are involved in the world of online / internet, have an email is a must. Many online activities require you to use email, a list of examples such as facebook, twitter, blog , online shopping and so forth. Email is a post office box in cyberspace, it is a means to communicate to receive and send messages. So, have an email address from now.

To create an email address a lot of options, some free and some are paid. Example of a paid email service is the name of the email based on domain names have, for example: xxx@gmail.com, the costs are paid hosting service for the domain name. Besides the pay, there are many free email services, the world's leading email services including the Yahoo mail, Gmail, Hotmail, and many others.

How to create an email in gmail

In this post, Kang Rohman will explain how to create an email in gmail (google miles).

Here's how to create an email in gmail:

  1. Please visit the following Gmail address: http://mail.google.com
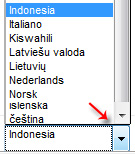
  2. To make it easier, change the language to Indonesia with a drop down button at the bottom right.

    gmail select a language
  3. Turn your attention to the right side of the monitor, then click the CREATE ACCOUNT button. You will be taken first page of the application form.


  4. Fill out existing form with your personal data:
    1. First Name: fill in your first name, eg: kang
    2. Name: fill in your name, eg: rohman
    3. Choose your username: this is what will be your email address, then fill with the desired name, eg: kangrohman. Then later email address will be kangrohman @ gmail. Com. You should know that the name of the email can only be owned by one person for the whole world, therefore the name is already taken by someone else you can not get or otherwise not available to be made new. Once the user name in the content, automatically check whether the name is still available or not, if not available, then you should find another name, or try to add a number, eg: kangrohman2012, kangrohman1234 or the other is still available.
    4. Create a password: fill in your desired password. Advice, make a strong password that is not easily scanned by the evil robot software code is a mixture of letters, numbers and special characters, for example: t-= 3AHaeswe> C_I. If you're having trouble creating a strong password, try using an online tool Strong Password Generator is in http://strongpasswordgenerator.com.
    5. Confirm your password: re-write password that had been in the insert (must be exact), for example: t-= 3AHaeswe> C_I
    6. Date of birth: fill in your birth date
    7. Gender: select gender you are. Example: Male
    8. Phone: fill in the phone number / your HP.
    9. Your current email address: fill in your email address other yag. If you do not have another email address, then empty it. It also called email recovery, this is useful if you ever want to get into your email account and forgot the password used, then you can request a password via the email address of this recovery.
    10. Prove that you're not a robot: See the text that appears, then write back the text written on the form below Type the two words again. Every word that appears will always be different every person you pass or refresh the page making email, commonly referred to as the word captcha.
    11. Location: select as the name that you live in the country, such as Indonesia.
    12. Check the small box next to the caption: I agree to the Terms of Service and Privacy Policy.

      cara membuat email
  5. Click the "Next Steps".
  6. The next google will send an SMS to a mobile number that has been put on.
  7. Enter the code that is sent by google on the form provided.
  8. Completed.

Email Security Tips

Email is an extremely vital in the online world, you must maintain the confidentiality of the email account password, do not let friends, girlfriend, sister or someone else will know the password that you use.

Here are some email safety tips:
  1. Create a strong password. Strong password is capuran of letters, numbers and special characters. On the internet a lot of malicious software that can scan password, the password is a word contained in the dictionary is a weak password and easily collapse.
  2. Keep your password. You should keep your password even though it told a close friend, boyfriend or your brother.
  3. Do not use the same password for the list to other sites. If one day you sign up to sites on the Internet, such as Facebok, twitter, hi5, or others, use your password to another, do not use the same password to the main email.
  4. Use another email to the list of those sites are less trusted. If you want to sign up to sites that did not clear the site such as the level of trust in social bookmarking sites scattered around the internet, online business program and the other, you should not use your email uatama, make another email for security. On the internet a lot of malicious parties who take advantage of an email, there are those who sell email data to others, anyone can break into your email and others, so be careful.
Of course there are many steps to secure your email accounts from those who intend evil, but just four points only on this occasion not to be too long.

That's one of the articles to create a blog about how to create email , this may be useful for you.

Friday, July 1, 2011

JUMPER on Computers: What and For What?

In wikipedia, termed jumper on the following:


A jumper is a short length of conductor used to close a break in or bypass part of an electrical circuit . Typically Jumpers are used to set up or adjust printed circuit boards , Such as the motherboards of computers .

Jumper on a computer is actually a connector (connector) yand electrical circuit used to connect or disconnect a sirk uit. Jumper is also used to set up the electrical board as a computer motherboard.
Let us focus on a jumper on a computer. Jumper is in the computer functions used for setting up computer equipment as necessary. Fortunately we are at this moment penyettingan via Jumper has begun to diminish its use. Therefore, all setting functions are now using outo setting making it easier for the user or computer assemblers are not much use Jumper.
Jumper on the computer is usually used on the motherboard, Hard Drive and Optical Disk, and in particular some VGA Card. But because of its use more on the motherboard and hard drive and Optical Disk, then we will consider only the third it.

Jumper on Motherboard
A. Clear CMOS Jumper
CMOS jumper usually located near the CMOS battery. Usually there are 3 feet (pin) on this jumper. Its function is to store and reset the CMOS (an IC program on Motherboard) to the default position (Initial Setting / Factory).

Usually the pin to 1 and 2 when connected to a CMOS Jumper on the normal position will save any settings that we change the CMOS / BIOS. And if we change the jumper in position 2 and 3, then the computer will return to the default position.

Then what was the default position? Of course, if we make the wrong setting for the CMOS / BIOS so if an error occurred that resulted in the computer can not live, then by performing the CMOS Clear the computer will return to the starting position before we make changes to the CMOS / BIOS.
Similarly, Clear CMOS Jumper can be used if the computer can not do life due to changes in hardware, such as processor, but because the CMOS / BIOS settings you have stored on computers that are old and not capable of reading the processor you just replace the Jumper can be you use.

Jumper is also used if you forget the password that you created in the BIOS. By doing a Clear CMOS, then the password that you create will disappear by itself.
2. Jumper Bus Clock / Bus Speed
This jumper setting Bus Clock function for the processor. At this time, almost exactly jumper is rarely used. Setting function that had been arranged by the jumper now made ​​outo or can be set via the BIOS.

In the picture beside this is one example of a computer Pentium I, which consists of Bus 50, 55, 60, 66 and 75. Is contained in the processor bus. Every bus that we choose, there are instructions on the use of jumper.

3. Jumper Bus Ratio
As with jumper Bus Clock / FSB, this jumper can practically not be reused. This jumper is a multiplication ratio of the processor. For example, Pentium I 133 MHz processor with a bus / FSB 66, then the ratio is 2x. Then we do the settings in accordance with the instructions contained in the description in both the motherboard and the manual.
4. VGA Jumper

This jumper is usually found on the motherboard that provides VGA onboard VGA as well as an additional slot. Jumper, usually consisting of 3 feet / pin is used to decide whether to use its onboard VGA or VGA slot. Just like-clock bus jumper, jumper it is rarely used and is replaced by outo setting, so without doing any setting, VGA will choose which one is used.
5. Jumper Audio

Sound jumper, jumper is used to activate the sound. This jumper is usually composed of 10 pins lined up with the pin number 8 blank. When you activate the audio in front of the casing, then automatically, in case the socket Audio Audio has enabled this jumper. But if not, prepare a jumper to connect pin number 5 and 6, also pin number 9 and 10, otherwise the sound will not come out even if the driver has been entered. And the incidence is often the case in which the audio can not be heard and those who do not understand the confusion and think of your motherboard onboard Sound off.
6. USB Power Jumper

Have you ever experienced something you can not get USB working? or works only in Windows? Not in DOS (for example by using a USB keyboard)? Maybe you do not activate the USB Power Jumper.
This jumper is on almost all motherboards that have USB Socket. Jumper consists of 3 feet / pin. If not installed, then your USB will not work. When in pairs on one leg, for example, pin 1 to pin 2 or pin 2 to pin 3, it will have a different effect. Which one will not be able to enable USB in DOS.
7. Jumper Memory / RAM

This jumper is usually found on the motherboard that has the facility of two types of memory slots, such as motherboards that have slots and DDR1 SDRAM memory, or DDR1 to DDR2, then to choose one memory slot jumper setting is required.
Jumpers on the Hard Drive or Optical Disk (CDRom, DVD, etc.)
A umper on Optical Disks Hard Disks, and usually to determine the status of the hard disk or optical disk. Status on the hard disk / optical disk whether he will be master (master) or slave (slave).

It is important to be noticed when we do tundem (merging with a hard disk, optical disk or hard drive with one cable). When both master status, then they will not be detected by the motherboard. Because it is a must menjad i Master (master) and one being a slave (slave).
On certain motherboards, the status of slave (slave) on a single hard drive (without doing tundem) will not be detected by the motherboard.
Statements regarding the status of Master and Slave can be on a label located on the hard drive. (DavidUsman)

Thus, may help.