Monday, January 21, 2013

How to Remove Blog on blogger


How to delete a blog on blogger.com is easy, but we can not deny, a lot of our fellow co-bloggers are still confused about how to remove blogger blog. Therefore, the post "How to Remove Blogs on blogger.com" is deliberately publish. Who knows, with this post, our colleagues who are still confused is getting a little enlightenment.

Before my guides bloggers to do the Delete Blog, bloggers must ensure themselves first, whether bloggers are sure 100% for mengahpus blog. If bloggers are unsure, just follow this blog tutorial.

How to Remove Blog at OLD USER INTERFACE:


  • In the Basic (Blog Tools), there are three options: Import blog, Export blog and Delete Blog. Buddy select "Delete blog".
  • Later bloggers will be faced with, whether bloggers will export your blog beforehand or not.
  • The process is complete and the blog has been deleted. 


How to Delete a Blog in the NEW USER INTERFACE:


  • Visit www.blogger.com
  • On the drop down menu, click Settings, and click Other 


  • In the Blog tools click Delete blog buddies
  • Blog successfully deleted 


How to Restore a Deleted Blog:
If bloggers deliberately or accidentally deleting your blog and wanted to restore or reinstate the blog buddy, buddy can restore your blog in a certain period of time after deletion. Buddy Dasboard go back to the menu and see the options left. Then click the word buddy "" Deleted blogs "and click the" Undelete this blog ". Blogs buddy will definitely be back to normal as usual anymore.

Wednesday, September 5, 2012

How To Create Table In Post Blogger / Blogspot


Creating a table in a blog post sometimes necessary in order to clarify the matter posts / articles or to shorten the explanation. In panel blogger posting there is no facility to create a table so we need to create the tables manually using certain HTML tags. Basis that we must first understand here is how to write code or a table in the post. In blogging tips this time I will share how to create a table and writing code HTML tags.

Basic HTML tags commands to create the table:

HTML Code
Information
<table>...</table>
The command to create a table

<tr>...</tr>
Command to make the line

<td>...</td>
The command to create columns

border, width, align, bgcolor
Additional code for setting a border line thickness, width of the table, the text alignment and background color


Now we try to create a 1x3 table (1 row 3 column), then writing something like this:


    <table border="1">
    <tr>
    <td>Contant 1</td>
    <td>Contant 2</td>
    <td>Contant 3</td>
    </tr>
    </table>


So the result looks to be like this:

Contant 1 Contant 2 Contant 3


Next we try to change the basic code above was to beautify the appearance of the text alignment and size of the width of the table we set the example 450px, then the writing will be like this:


<table border="1" width="450">
<tr bgcolor="#F2F2F2">
<td align="center"><b>content 1</b></td><td align="center"><i>content 2</i></td><td align="center">content 3</td>
</tr>
</table>

So the result looks to be like this:

content 1content 2content 3

2 examples of this simple buddy please apply to create a table in your posts by using the basic commands of the table as well as the additional code necessary so that the final result table created so much good and interesting. The material of this post is not enough if memorized it but it would be better if we just try making practices. First determine the type or shape of the table to create a mate, and then trying to write the script in notepad, open panel blogger posting mate then paste the code table created earlier script there and look preview. I am sure this way will accelerate our understanding of how making this table. Hopefully these tips can be useful, nice happy blogging!

Sunday, August 12, 2012

How to make a Blog on Blogger

create a blog
How to make a Blog on Blogger - Blog is sigkatan from "Web log" is one of the web application in the form of writings commonly referred to as posting on a web page. The writings are often sorted from the latest and followed by a long time.

At first, the blog was created as personal records are stored online, but now the contents of a blog is very varied which contains tutorials (eg this blog), vent, businesses and others. In general, the blog is no different than any website on the Internet generally.

Flat form is often called a blog or a blog engine created as such by the designer / programmer so that the blog is easy to use. First, to create a web application requires a knowledge of HTML programming, PHP, CSS, etc., with a blog it becomes easy as calling the numbers 1 2 3.

How to make a Blog on Blogger

One provider of free blogs are quite popular today is the blogspot or blogger , wherein when mendaptar is through blogger.com site but the domain name you will get is a sub domain from blogspot, for example: contohsaja.blogspot.com

Why make a blog at blogger.com instead on another blog site provider? Actually there is no necessity to create a blog on blogger, but there are many advantages that appeal to bloggers in other blog providers. Some examples of the advantages that the other bloggers in the appeal that is simple in operation making it suitable for beginners, more flexibility in changing and editing the blog template so that you will be more fresh for the creation of its own, custom domain or you can change the name of your blog with your own domain name eg contohsaja.blogspot.com converted into contohsaja.com, while still using blogspot hosting and still remain free.

It should be emphasized from the outset that the internet is very dynamic in nature, so it may be in some future time the user create a blog on blogger will be slightly different than what you see on blogger.com

To reduce the unnecessary things in writing, the following to create a blog on blogger.com

Creating Email

One of the requirements that must be met in a blog is that you have the address of email is still active or in use. If you do not have an email address, please register in advance at gmail because blogger is one of Google's services when signing up to a blogger then you should use a gmail email. If you do not understand how to create an email, please read first post how to make a gmail email .

Blog List in Blogger

  1. Please visit http://www.blogger.com
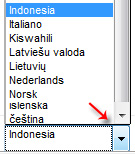
  2. Once the registration page is open, turn your attention to the bottom right, change the language to Indonesia to be more easily understood.
    select a language
  3. Please direct entrance / login with username / password and user name / password you gmail (the email account you can to log into blogger).

    gmail login
  4. Fill out existing form:
    1. Display name: fill in the name of the profile that you want to appear on your blog.
    2. Gender: select according to your gender, ie men.
    3. Acceptance of Terms: Rate Tada checklist as a sign that you agree with the rules set by the wherewith the blogger. Suggestion: you should first read the existing requirement that you know and understand what is allowed and not allowed when using blogger.
    4. Click the arrow labeled "Continue".

      continue to create a blog
  5. Click the "New Blog".

    create a new blog
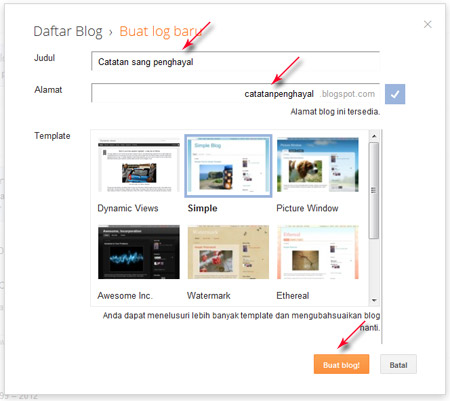
  6. Fill out the form:
    1. Title: Fill in the blog title is in want, for example: the visionaries graffiti
    2. Address: fill in the desired blog address. Remember! This address can not be edited again after it is created, if you want to get serious, then choose a name that you really want.
    3. Template: select a template (view blog) is favored (this may change again).
    4. Continue to click the "Create blog".

      create a blog
    5. Up here on the blog you've successfully created.
  7. To avoid spam filters, you should immediately post any course. Click "Start posting".

    start posting
  8. Fill in title and article. Finish by clicking the "Publish".

    published
  9. Please refer to your blog by clicking the "View Blog"
  10. Completed.
Now your blog has been created and can be opened in different parts of the world. Announce to your friends that you now have a blog.

For the first phase seems to be enough, please read other articles about how to create a blog on the this blog

Wednesday, July 4, 2012

Enjoy New Features Custom Blogger Permalink (URL Editor)

After long-awaited, feature custom permalink Blogger finally arrived, though still a draft. With custom permalink presence, we can easily customize to the permalink before publishing (publish) posts. However, since new in draft form, then this feature can only be accessed through draft.blogger.com (Blogger in Draft).

Before the presence of features permalink edit this blogger, I have to outsmart the words in the title of the post so that the words in the permalink is not interrupted and no loss of meaning. I have to write down important words first, for visitors as well as for optimizing the keyword in the permalink . The trick is to first write down the important words in the title box, publish, and edit the title again. Of course this is inefficient and unsatisfactory.

Well, now the custom features already present in the Blogger permalink. We do not need to edit the post title back and forth. It takes just write the name permalinks through the "Permalink" in Blogger post editor. Efforts to optimize SEO keyword in the url to get more leverage permalink. Improve SEO blog was so much easier.

The steps use the features of Blogger Custom Permalink

1. Because it is still a draft, access dashboards through draft.blogger.com .
2. Open the post editor (new post, new post), such as when they wanted to write a new post.
3. Notice the "post settings" on the right sidebar, there are some features to make customization posts, see "Permalink", click it.

4. There will be two options, "automatic URL", and "custom URL". The first is the default, adjust the url title. The possibility of very large cut. To perform customization permaling, p ilih second option.

5. After selecting the option "custom URL", type the name of the permalink posts as you wish. There is one important thing to note: Do not put spaces. Give a hyphen / dash (-) between each word, according to the type permalink Blogger.
example: open-secret-blogspot-custom-permalink
6. Click Done. You can continue to make a post or direct "publish".

Review and Notes Blogger Custom Features Permalink

As noted above, because it is still a draft, then this feature has not been fully, or 100% free of problems. In fact, this feature may not be officially released later. There are some things I see from this feature, both the advantages and drawbacks:
A. Number of characters in permalinks, after I checked, could reach about 45-80s characters (possibly slightly more), adjusted to the length of the overall character of the url. That is, limit the number of characters depends on the length of the name of the blog. The longer the name of the blog, the fewer the number of characters that can be made in custom permalink.
2. There is one significant drawback that I think no major changes in the presence of this feature. Custom permalinks can only be made before a post is published. That is, after posting sebauh published the permalink no longer editable. Unlike WordPress where users can edit the permalink to the post of any kind (draft or published posts).
3. Custom permalink applies only to the name of the file. If there yesterday who asked about changing the permalink structure, the feature is not (or at least not yet exist). The point is, the questioner wants to make url permalink clean, no-frills folder corresponding month of the year (Example: 2012/07). This feature is called the url rewrite, and both are very different features. This feature involves htaccess, and Blogger does not allow / provide access to it (cPanel). Blogger also does not permit the use of a plugin / addon.

Yup, that's it. Although there are many shortcomings, I think this feature quite a lot of help in the preparation effort permalink keyword in the title without having to edit posts. Hope this post useful, have a nice blogging, then. :)

Tuesday, February 14, 2012

How to Create a Table of Contents (Sitemap) in Blogger / Blogspot

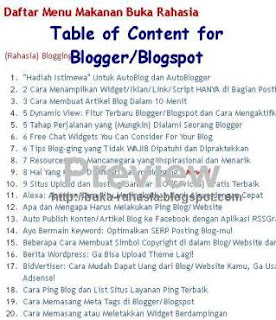
Table of Contents (Table of Contents) are often referred to as a sitemap (site map) because it is generated (generated) from the url sitemap feed. If the sitemap blog on search engine serves as a tool to facilitate the mapping of the content of your blog / website by search engines, then the sitemap which serves as a means of navigation and mapping for the visitor / visitor to view the entire contents of the article content or the blog / website in a particular page. Obviously this is very lucrative visitors and also the owner of the blog / website in an effort to increase the number of pageviews .

Contents of this time made with javascript rule that my file was already uploaded and can be directly used. Contents are shown divided by the label, so it should be highlighted that every post should have a label. Without labels, posting will not be included in the table of contents. Check out how to label bloggers who do not know how to create a label ..
How to create a table of contents / sitemap blog in blogger / blogspot:
A. Create a new post page, the page should be static (static page).
Dashboard> New Post / Edit Post> Edit Pages> Create New Page
2. Give it a title as you like, for example: "Content", "Table of Content", "Sitemap Blog", and others.
3. Post box on the right side click "Edit HTML".
4. Insert the following script:
<script src="http://yourjavascript.com/66814861421/nanzanet.js">
</script>
<script src="http://nanzanet.blogspot.com/feeds/posts/default?max-results=9999&amp;alt=json-in-script&amp;callback=loadtoc">
</script>
Replace the url http://nanzanet.blogspot.com blog / website.
5. If you want to see the results click the "preview / preview".
6. Publish post.
7. Replace the page link to blog link list, menu, or at the desired place.
8. Done!
-------------------------------------------------- -------------
You now already got a sitemap / table of content page for your blog visitors!